Garlic knots are a beloved appetiser or side dish that can elevate any meal with their irresistible combination of chewy dough, garlicky flavor, and buttery goodness.
Whether you’re hosting a game day party, enjoying a pasta dinner, or simply craving a delicious snack, homemade garlic knots are a must-try. In this comprehensive guide, we’ll walk you through everything you need to know to make the perfect garlic knots from scratch. From choosing the right dough to shaping and baking the knots, we’ve got you covered.
*this page may contain affiliate links
Section 1: Introduction to Garlic Knots
Garlic knots are a popular Italian-American creation that originated in pizzerias and quickly gained popularity for their incredible taste. These knots are made from a simple dough, flavoured with garlic, and brushed with a generous amount of butter. The result is a soft and fluffy bread with a golden brown crust and a burst of garlicky flavor in every bite.
Section 2: Benefits of Homemade Garlic Knots
Making garlic knots at home has numerous advantages over ordering them from a restaurant or buying pre-made ones. Here are some of the benefits:
– Made from Scratch
When you make garlic knots at home, you have full control over the ingredients and can ensure that they are fresh and of high quality. You can also adjust the flavours and seasonings to suit your taste preferences.
– Cost-Effective
Homemade garlic knots are much more cost-effective than buying them from a restaurant. With just a few basic ingredients, you can make a large batch of knots that will feed a crowd without breaking the bank.
– Customisable
One of the best things about making your own garlic knots is that you can customize them to your liking. You can experiment with different herbs, spices, and cheeses to create unique flavours that suit your taste.
– Fresh and Hot
Nothing beats the taste of freshly baked garlic knots straight out of the oven. When you make them at home, you can enjoy them at their peak freshness and savor the warm, buttery goodness.
Section 3: Choosing the Right Dough
The key to great garlic knots lies in choosing the right dough. While you can use store-bought pizza dough, making your own dough from scratch adds an extra layer of flavor and satisfaction to the process. Here are some options to consider:
– Homemade Pizza Dough
Making garlic knots with homemade pizza dough is a fantastic option. The dough is easy to prepare and has a perfect balance of chewiness and tenderness. You can use your favorite pizza dough recipe or try our homemade pizza dough recipe for a foolproof result.
– Store-Bought Pizza Dough
If you’re short on time or prefer convenience, store-bought pizza dough is a viable alternative. Look for a high-quality dough that is fresh and free from additives. Be sure to let the dough come to room temperature before using it, as this will make it easier to handle and shape.
Section 4: Shaping the Garlic Knots
Shaping the dough into knots is a fun and creative process. While it may seem intimidating at first, it’s actually quite simple once you get the hang of it. Follow these steps to shape your garlic knots:
– Preparing the Dough
Start by preparing your dough according to the recipe instructions. Once the dough has risen, punch it down to release any air bubbles and transfer it to a lightly floured surface.
– Shaping the Dough
Divide the dough into equal portions and roll each portion into a rope shape, about 8 inches long. Tie each rope into a knot, tucking the ends underneath or leaving them out, depending on your preference. Place the shaped knots on a baking sheet lined with parchment paper, leaving some space between them to allow for rising.
– Letting the Knots Rest
After shaping the knots, let them rest for about 30-45 minutes. This will allow them to rise slightly and develop a light and fluffy texture.
Section 5: Garlic Butter Topping
The garlic butter topping is what takes these garlic knots to the next level. Here’s how to make it:
Ingredients
- Butter, melted
- Garlic cloves, minced (or 1/2 teaspoon garlic powder)
- Olive Oil
- Parmesan
– Preparation
In a small saucepan, melt the butter over low heat. Add the minced garlic, olive oil, and Parmesan. Cook for a few minutes until the garlic becomes fragrant. Remove from heat and set aside.
Section 6: Baking the Garlic Knots
Once your garlic knots are shaped and the garlic butter topping is ready, it’s time to bake them to golden perfection. Follow these steps:
– Preheating the Oven
Preheat your oven to 210°C and adjust the rack to the middle position. This will ensure that the knots bake evenly.
– Brushing with Garlic Butter
Using a pastry brush, generously brush each knot with the prepared garlic butter, making sure to coat them thoroughly.
– Baking Time
Place the baking sheet in the preheated oven and bake the garlic knots for approximately 15-20 minutes, or until they are golden brown and cooked through. Keep an eye on them as baking times may vary depending on your oven.
– Optional Garnishes
For an extra touch of flavor, you can sprinkle grated Parmesan cheese and chopped fresh parsley on top of the knots after they come out of the oven. This adds a beautiful presentation and enhances the taste.
Section 7: Serving and Storing Garlic Knots
Once your garlic knots are baked to perfection, it’s time to enjoy them. Here are some tips for serving and storing:
– Serving Suggestions
Garlic knots are incredibly versatile and can be served in various ways. They make a fantastic appetizer, especially for game day parties or gatherings. You can also serve them as a side dish alongside your favorite pasta dinner or as part of a homemade pizza night. Dip them in marinara sauce or enjoy them on their own.
– Storing and Reheating
If you have any leftover garlic knots, store them in an airtight container at room temperature for up to 2-3 days. You can also refrigerate them for around a week. To reheat, simply place them in a preheated oven at 350°F (180°C) for a few minutes until warmed through. Alternatively, you can microwave them for a quick reheating option.
Section 8: Frequently Asked Questions (FAQs)
Can I make garlic knots in advance?
Yes, you can prepare the dough in advance and refrigerate it until you’re ready to shape and bake the knots. You can also freeze the baked knots for up to 3 months and reheat them when needed.
Can I use active dry yeast instead of instant yeast?
Yes, you can use active dry yeast as a substitute for instant yeast. However, you will need to activate the yeast first by dissolving it in warm water with a pinch of sugar. Let it sit for a few minutes until it becomes frothy, then proceed with the recipe as usual.
Can I add different herbs and spices to the dough?
Absolutely! Feel free to experiment with different herbs, such as rosemary, thyme, or oregano, to add extra flavor to the dough. You can also sprinkle some grated cheese, such as Parmesan or mozzarella, on top of the knots before baking for a cheesy twist.
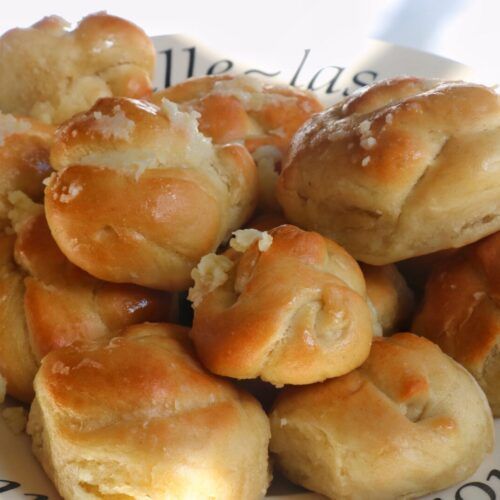
Homemade Garlic Dough Balls Recipe 🧄🥖
Ingredients
For the Dough Balls
- 1 ¼ Cup Warm Water
- 1 Tbsp White Sugar
- 2 Tbsp Yeast
- 1 ½ Tsp Salt
- 3 Cups Plain Flour
- 1/8 Cup Olive Oil
For the Garlic Butter
- 1/4 Cup Melted Butter
- 1/4 Cup Grated Parmesan
- 2 Tbsps Olive Oil
- 2 Cloves Minced Garlic
Instructions
For the Dough Balls
- Mix together the warm water and white sugar until dissolved1 ¼ Cup Warm Water, 1 Tbsp White Sugar
- Mix in the yeast2 Tbsp Yeast
- Add in your flour, olive oil and salt and mix until a rough dough forms3 Cups Plain Flour, 1/8 Cup Olive Oil, 1 ½ Tsp Salt
- Knead your dough for about 10 mins
- Let your dough rise in a greased bowl for around 1 hour-90 mins
- Once your dough has risen, take 15 cm long pieces of dough and wrap them around your finger about 3 times (see video below for more details)
- Place each knot onto a baking tray lined with parchment paper
- Let your dough rise in a warm, dry place for around 45 mins
- Preheat your oven to 210ºC
- After rising, bake your dough balls in the oven for around 15-20 mins
For the Garlic Butter
- Mix together your melted butter, parmesan, olive oil and minced garlic until combined1/4 Cup Melted Butter, 1/4 Cup Grated Parmesan, 2 Tbsps Olive Oil, 2 Cloves Minced Garlic
- Set aside while your rolls bake
Assembling the Garlic Knots
- Place your warm garlic knots into a large bowl
- Pour your garlic butter mixture over your rolls
- Cover your bowl in Saran wrap so that everything is nicely secure
- Shake your bowl around so that the garlic butter covers all your rolls
- Place your bowl upside down onto a plate and let them rest for around 15 mins
- Turn out your Garlic Knots and serve them onto a platter and enjoy!
Video
Remember to have fun and get creative with your garlic knots. They are a versatile and delightful treat that can be enjoyed on any occasion. Enjoy!
And that’s just about it for this blog post! Did you like this recipe? Have any thoughts or questions? Leave us a comment below or email us on [email protected] 💓
Don’t forget to sign up to our email list below where you can receive a free notion meal planner template and a blog post writing checklist 💫