I have always loved Funfetti desserts, sprinkles and all things colourful. This recipe combines all of these elemtents compacted into a small 4” cake pan.
Perfect for a family of 4, this Mini Funfetti Cake embodies classic nostalgia of childhood birthdays, pink buttercream frosting and tons of sprinkles!
*this page may contain affiliate links
How do you keep sprinkles from bleeding in cake batter?
The number one reason for sprinkles to bleed or dissolve into your cake batter is the type of sprinkles used in a cake. There are many different types but are here are the most common:
- Non-Pareils
Non-pareils are the most widely known sprinkles that bleed in your cakes, creating a brownish coloured cake. I would definitely not recommend to use these when making anything funfetti. You can of course use these for decorations on a cake but it’s also not a good idea to mix these with frosting as they will also ruin the colour.

- Jimmies
Jimmies are a very good option to go for when baking. They do not bleed into the cake batter and come in many different colours and mixes. My favourite shop for any type of sprinkles is Sweetapolita.

Tips for a Moist Vanilla Cake
Most people think vanilla cake is a very easy and simple recipe to bake but sometimes the easiest things in life are the hardest! But don’t worry I’ve got a few tips and tricks that ensures your cake is moist and delicious for days.
- Cake Soak– cake soak is basically a sweet liquid that you can use to keep a cake moist while it puts up with harsh conditions of the fridge and freezer. Some use a simple syrup made out of water and sugar, but I like to use any type of milk mixed with a bit of sugar for sweetness. You can also add gel food colour to our soak for added colour- in case you sprinkles dissolve in your batter 🥲
- Do not Over-bake your Cake!– If you want a moist cake, you need to bake your cake for the right amount of time. If your cake has been in the oven for too long it becomes dry and becomes stale more quickly. Stop baking your cake when it turns a light golden brown colour and a toothpick inserted into the middle, comes out clean.
- Do not Over-mix your Cake!– You do not want to develop a lot of gluten when baking cake as this reduces it’s light fluffiness. When mixing in your flour, be very gentle and fold it into your wet ingredients. STOP mixing when you can no longer see any flour in your batter.
Some tools used in the making of this cake:
Turntable- https://amzn.to/3rJiiZC
Cake pans- https://amzn.to/3EpGO9Q
Sprinkles- https://amzn.to/3SLcj2m
Vegetarian Food colouring- https://amzn.to/3EsTqwK
Want to know how I edit my posts? I use Elementor! Click the link below to sign up:
(If you like this mini funfetti cake click here for more recipes)
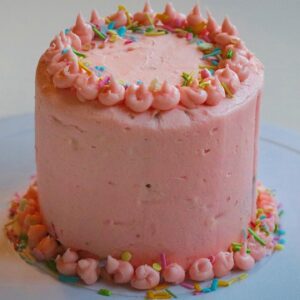
Mini Funfetti Cake
Ingredients
For the Funfetti Cake
- 1/2 Cup + 1 tbsp Salted butter
- 1/2 Cup + 2 tbsps White Sugar
- 2 Large Eggs
- 3/4 Cup + 2 tbsps Self-raising Flour
- 1/2 Tbsp Milk
- 1/2 Cup Sprinkles
For the Buttercream Frosting
- 1 Cup Softened Butter
- 2 ¾ Cup Powdered Sugar
- 1-2 Tbsp Milk
- Pink Gel Food colouring
For the Cake Soak
- 1/4 Cup Milk
- 1/2 Tsp White Sugar
- Pink Gel Food Colouring
- Sprinkles to decorate
Instructions
For the Funfetti Cake
- Preheat your oven to 190ºC
- Cream together the butter and sugar until combined
- Whisk in the eggs until pale and fluffy
- Gently whisk in the self-raising flour and milk
- Stir in the sprinkles using a spatula
- Pour your batter into two 4 inch cake pans, greased and lined with parchment paper
- Bake the cakes in your preheated oven for about 20-25 mins
For the Buttercream Frosting
- Cream together the butter and powdered sugar until combined
- Stream in some milk to loosen the icing until you reach your desired consistency
- Add in a drop of gel food colouring and mix until your frosting is one uniform pink colour
For the Cake Soak
- Mix your milk and sugar into a small bowl
- Add in a few drops of pink gel food colouring
- Set aside until you decorate your cake
Assembling the Funfetti Cake
- Level each cake layer and cut into two further layers (you should now have 4 cake layers)
- Start by spreading some buttercream onto your turntable so the cake stays in place
- Add some cake soak onto your cake to keep it moist (using a silicone pastry brush)
- Spread some buttercream on your first layer
- Add your next cake layer and complete this process with all your layers
- Spread some icing onto your cake using a spatula
- This is the crumb coat so do not worry if you can still see the crumbs here
- Place your cake in the fridge for about 20 mins to chill
- After chilling spread a thicker layer of icing onto your cake
- Once all of your cake is covered, use a cake scraper to remove any excess and to create a smoother finish
- Use a spatula to smooth out the top
- Using a piping bag, pipe small blobs of icing around the top and bottom of your cake
- For extra decoration, add sprinkles around the top and bottom perimeters of your cake
- Slice it up and enjoy!